Version control with git
Just as when writing any other type of software, when doing data science it’s really useful to keep your code under version control. The de facto standard for code version control is git, which comes preinstalled on Faculty platform. This document provides some tips on using git effectively in the data science workflow on Faculty platform.
Contents
The git command line interface
The most common way to use git in the platform is using the command line interface (CLI). This allows you to perform git operations by running commands in the terminal.
To get started with a repository, you first need to clone it on the platform. This makes a copy of the repository on the platform where you can commit new changes, which can later be pushed back to the “main” repository you clones from.
For example, to clone the Faculty Python library from GitHub, create a server in a project’s workspace, open a terminal (click the Terminal icon on the server once ready) and run the following command:
git clone https://github.com/facultyai/faculty.git
Once the repository is cloned, you can view and edit its files, stage and commit changes, and eventually push changes back to GitHub (see the note below about authentication).
Using git requires more than just cloning repositories, however. For a more complete introduction to using git, in particular the CLI, we recommend doing one of the many free interactive tutorials online, such as this one by codecademy.
VSCode interface
In addition to the CLI, you can also use git through its integration in the VSCode editor that comes preinstalled on platform servers.
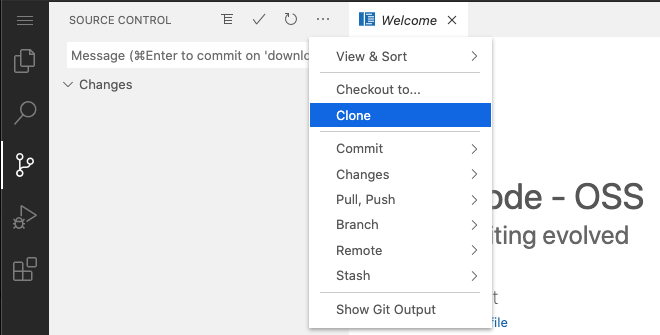
In the VSCode interface, which can be found via the “Editor” option in the ellipsis menu on servers in the workspace, git can be used from the “Source Control” view. In this view, you can clone git repositories via the ellipsis menu at the top of the interface:
Adding, committing and other parts of the git workflow can be managed from the VSCode Source Control view, as summarised in the VSCode documentation, however we recommend using SSH keys for authentication (rather than using VSCode’s integrations with GitHub etc.) as described below.
Tips for using git on Faculty Platform
Through our experience using Faculty Platform and the experience of our internal and external users, we have collected some useful practices that help make using git on the platform more productive.
Configuring the git user name and email
When making commits with git, it stores information with the commit about who create it and when. Code hosting providers like GitHub then use this information to match commits with users.
By default, Faculty Platform configures git to use the name and email address you used to sign up to the platform. To see the configured username and email address, you can run these commands in the terminal:
git config user.name
git config user.email
If you want to modify the name or email address associated with commits you make, you can do this with:
git config --global user.name "Jane Bloggs"
git config --global user.email jane@bloggs.com
Work on separate copies of the repository
Most of the time, people use git by cloning repositories to their computer, make changes and push back to a shared code hosting service like GitHub or Bitbucket.
However, the model on Faculty Platform, where all members of a project can access and edit the same files (those in the project’s workspace), can present some challenges to git users. If, for example, multiple data scientists are working on the same copy of a repository, one user can very easily overwrite or discard changes of another. This is an unfortunate but necessary consequence of git’s design when used on shared filesystems, where commonplace operations like checking out branches modify the working copy of files accessed by the user.
It is possible to have multiple users working on the same copy of a repository, but it requires a lot of coordination and incurs a lot of friction. Instead, we strongly recommend that when multiple users need to work on the same codebase, that they make a full copy of the repository per user and perform any code merges through their code hosting service. Our most common pattern for managing this is to have a development directory for each user in a project, containing files (including code repositories) that others are expected not to modify without permission.
git is designed to facilitate a branching code development model, recognising that branching is an inevitable part of code development and providing the tools to make merging as easy as possible. We have found that despite the apparent initial pain of setting up a separate copy of a repository per user, than in the long term embracing this model is much more manageable.
Clean output from notebooks
When working in the platform, you may often find yourself using Jupyter Notebooks. The interactive, rich output environment of notebooks is a great for the exploratory and iterative nature of data science, but they can result in confusing diffs in git, which is predominantly aimed at simple code files.
Tools like nbdiff (which comes preinstalled on Faculty Platform) make it
easier to compare versions of notebooks stored in git, and some code hosting
platforms will show rich comparisons of the notebooks in their user interface,
however differences in which cells were run in a notebook and in which order
can still result in complex and/or large diffs due to differences in the stored
outputs.
We therefore recommend that all notebooks committed to git be first cleared of
their output. This can be done either through the Jupyter UI (Cell > All Output
> Clear, and then re-save the notebook) or with the nbclean command line
tool (requires installation with pip first).
Use a separate copy of the repo for jobs and development
Jobs and git go well together - with a versioned codebase and jobs’ easily reproducible execution environment and parameters, large parts of the data science workflow can be made faster and more consistent.
However, care should be taken to ensure that the code run by jobs consistently uses the exepcted branch or commit. Running code from a copy of the repository that you or another data scientist is using for development can be troublesome. An uncommitted change to the repo, or simply forgetting to switch back to the main branch, can result in unexpected errors, or worse, subtly different results.
To avoid these issues, we suggest that jobs use a separate copy of the repository that remains untouched during development, except to explicitly update the version of code used. This typically lives in a dedicated directory, separate from any data scientists’ copies of the repo being used for development.
An even stronger pattern, that requires a bit more setup, is to use a feature
of most code hosting providers called deployment keys. These allow you to
generate a special key that provides read-only access to a single repository.
Using deployment keys, a job can be configured to clone a dedicated copy of the
repository before running its code. This means that the job can be guaranteed
to be running the expected branch or commit, unaffected by the state of any
repo in the project workspace. In this pattern, we recommend storing the job’s
copy of the repo to the /tmp filesystem, which is only accessible by the
individual job run/subrun. Consult your code hosting provider’s documentation
for more information on setting up deployment keys.
Use SSH keys for authentication
By default, most code hosting services will recommend that you clone git repositories over HTTPS, which uses your username and password for authentication. Not only can this be inconvenient (as you need to reenter your password for the code hosting service on a regular basis), but in some instances a git repository might be configured to always use a particular username of the code hosting service, leading to some confusion by collagues on the project.
We recommend that users instead use SSH keys to authenticate their access to code hosting providers. SSH is another protocol that can be used by git to communicate with code hosting services like GitHub and Bitbucket, and uses a pair of key files (one public, one private and secret) to prove your identity. Setting up SSH keys requires around 10 minutes of one-off setup by each user, but in the long term this time investment is well worth it:
1. Create the SSH key
Create a server in Faculty Platform and open the terminal. Run the following command to generate an SSH key:
ssh-keygen -t ed25519 -C faculty
You will be prompted to enter a location to store the SSH key and to enter a passphrase. Just hit enter to accept the default values - this will generate a passwordless SSH key in your home directory.
Your home directory is available on all your servers on all projects, but is not accessible to other users, so can safely be used to store credentials such as SSH keys that identify you as an individual.
2. Copy the public key
Running the above command will generate an SSH key with two parts - a public part and a private part. The public part can be safely uploaded to GitHub and Bitbucket (they will us it to verify your identity when using the key), while the private key is secret and should not be shared (anyone in possession of it could masquerade as you).
To copy the public key, run the following command to print it to the terminal and then copy the printed text:
cat ~/.ssh/id_ed25519.pub
Make sure you copy the file that includes the .pub extension - the part
without the extension is the private key, which should not be shared. The text
you copy should look similar to the following, and you should include the
leading ssh-ed25519 part:
ssh-ed25519 AAAAC3NzaC1lZDI1NTE5AAAAICLKIXvyP4jrPGyUrNdvvkKv70TeIQ1f0/QFAwihuiY faculty
3. Add the public key to your code hosting service
In order to use this key to authenticate access to your code repositories, you should add it to the settings of you account on your code hosting tool. Below are links for doing this on commonly used providers:
4. Clone repositories using SSH
Now that you’ve set up SSH keys, you can access repositories using SSH. To do this, you’ll need to use SSH URLs for repositories when cloning, pulling and pushing.
For new repositories, this is easy. All the common git hosting providers have a “Clone” or “Code” button that provide you with the HTTPS and SSH URLs for each repo. To clone a repository with SSH, simply use the SSH URL instead of the HTTPS one. For example, our earlier cloning example would become:
git clone git@github.com:facultyai/faculty.git
For existing repositories, you may need to change the URL used by git when
pushing and pulling commits. This can be done with the git remote command -
open a terminal, navigate to the repostiory and run:
git remote set-url origin GIT-URL
replacing GIT-URL with the correct SSH URL for the repo. In the earlier
example, this would be:
git remote set-url origin git@github.com:facultyai/faculty.git